Windows Firewall: A Complete Reboot Guide

Windows Firewall: A Complete Reboot Guide
The Windows Firewall protects your device from malicious threats. But if you don’t configure its settings correctly, this tool might prevent you from accessing most of the apps on your device.
So, what’s the solution if you’ve configured the wrong firewall settings by mistake? It’s simple—all you need to do is reset these settings to their defaults.
Let’s dive in and explore all the solutions.
Disclaimer: This post includes affiliate links
If you click on a link and make a purchase, I may receive a commission at no extra cost to you.
1. Use the Control Panel
The Control Panel is an incredible tool that allows you to troubleshoot system issues or tweak PC settings. Now, let’s check out how this tool can help you reset the firewall settings:
- Type Control Panel in the Start menu search bar and select the Best match. Alternatively, check out the various way to access the Control Panel .
- Click the View by drop-down menu and select either the Small icons or Large icons option.
- Select Windows Defender Firewall from the menu items.
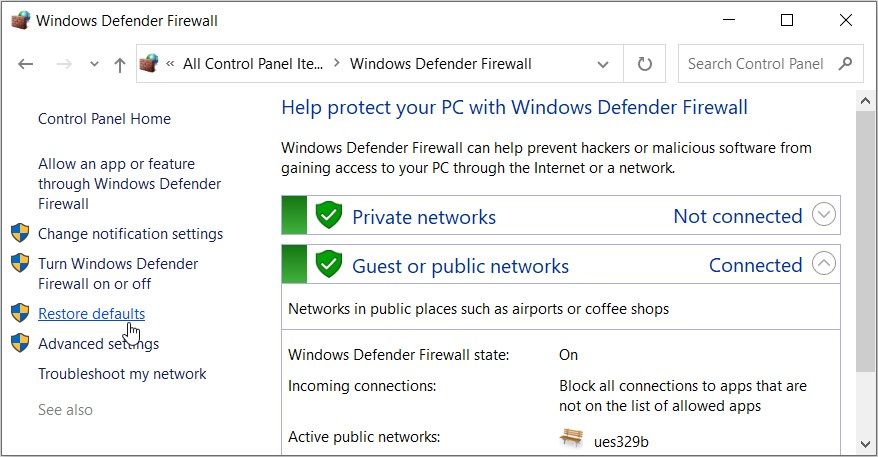
- Click the Restore defaults option on the left-hand side and follow the on-screen instructions.

2. Use the Command Prompt
Ever used the Command Prompt before? It’s an incredible tool that helps you configure system settings, troubleshoot PC issues, and access various apps.
In fact, you can perform a lot of tasks with this tool as long as you type in the correct commands .
Now, let’s check out how to reset the firewall settings using the Command Prompt:
- Type Command Prompt in the Start menu search bar.
- Right-click on the Best match result and select Run as administrator.
- Type the following command and press Enter:
netsh advfirewall reset
Wait for the process to complete. From there, restart your device to save these changes.
3. Use Windows PowerShell

Struggling to reset the firewall settings using the Command Prompt? If so, then try Windows PowerShell .
Here’s how to reset the firewall settings using PowerShell:
- Type Windows PowerShell in the Start menu search bar.
- Right-click on the Best match result and select Run as Administrator.
- Copy-paste the following command into PowerShell and press Enter:
(New-Object -ComObject HNetCfg.FwPolicy2).RestoreLocalFirewallDefaults()
Wait for the process to complete, and then restart your device.
4. Use the Windows Security App
The Windows Security app is a tool that helps you scan and fix system bugs. Interestingly, you can also use this tool to reset the firewall settings.
Here are the steps you need to follow:
- Press Win + I to access the system settings.
- Select the Update & Security option.
- Click the Windows Security option on the left-hand side.
- Select the Firewall & network protection tool in the middle pane.
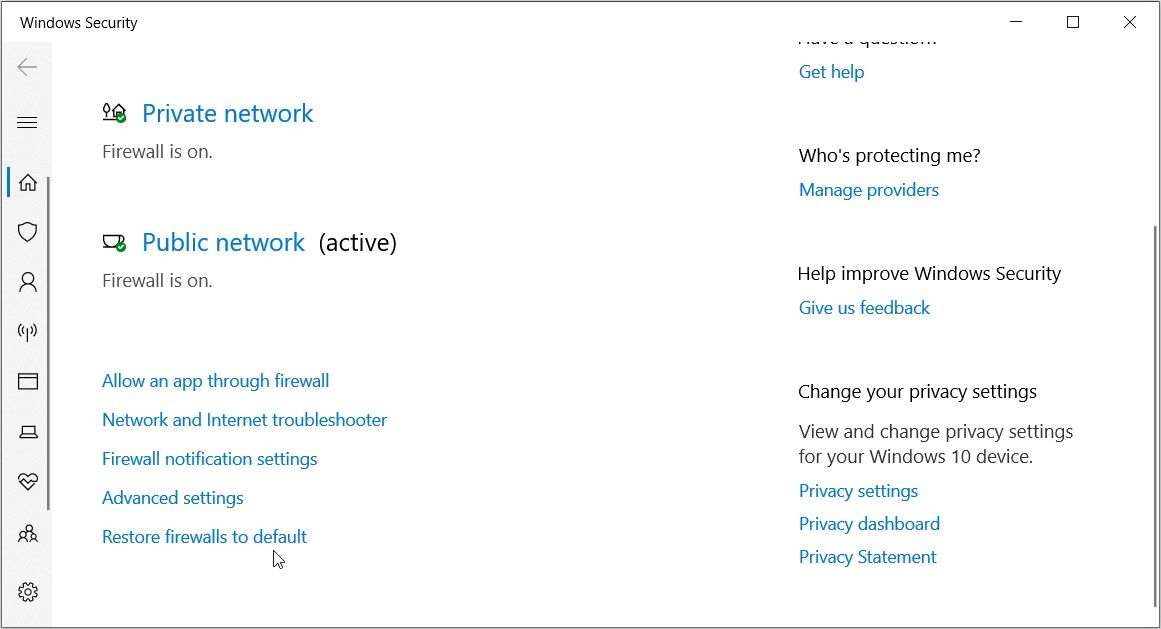
- Click the Restore firewalls to default option on the next screen.

5. Use the “Firewall with Advanced Security” Tool
Still can’t reset the firewall settings? Try one of the options in the “Windows Firewall with Advanced Security” screen.
As the name suggests, the “Windows Firewall with Advanced Security” tool allows you to configure various advanced settings. So, you can use it later if you want to tweak various firewall settings.
For now, let’s check out how this tool can help you reset the firewall settings:
- Press Win + R to open the Run command dialog box.
- Type wf.msc and press Enter to open the “Windows Defender Firewall with Advanced Security” screen.
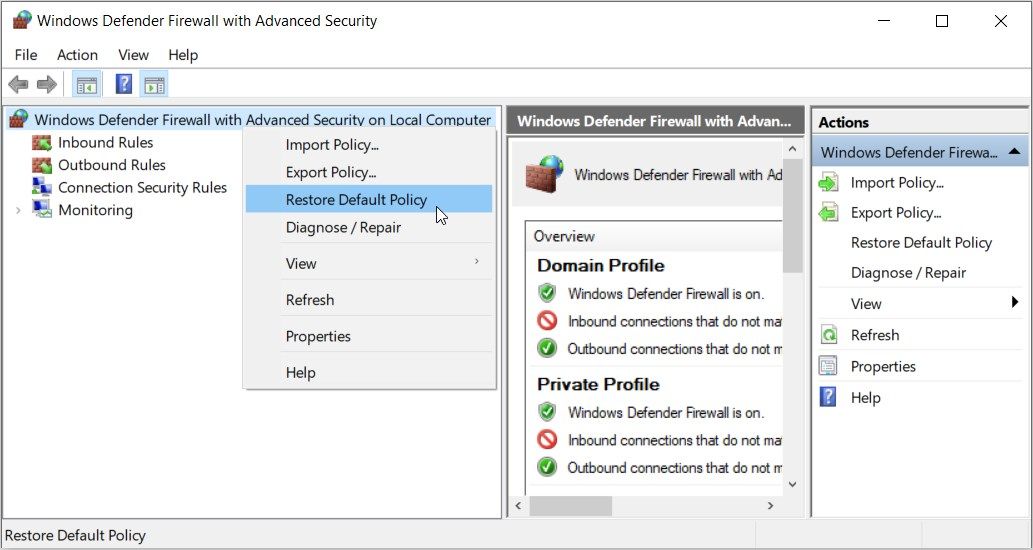
- Navigate to the top-left corner and right-click on the Windows Defender Firewall with Advanced Security on Local Computer option.
- Select the Restore Default Policy option.

Can’t access the “Windows Defender Firewall with Advanced Security” screen using the steps we’ve covered? Try these methods:
- Press Win + I to access the system settings.
- Select the Update & Security option.
- Click the Windows Security option on the left-hand side.
- Select the Firewall & network protection tool in the middle pane.
- Click Advanced settings in the middle pane.
From there, right-click on the Windows Defender Firewall with Advanced Security on Local Computer option and select the Restore Default Policy option.
Restoring the Firewall Settings to Their Default Settings
It’s quite frustrating when the firewall settings prevent you from accessing the apps on your PC. But the good news is that you can simply resolve such issues by resetting these settings.
To reset the firewall settings with ease, check out any of the tips we’ve covered. And if you want to reset the Settings app instead, there are solutions for that too!
Also read:
- [New] The Ultimate Path to Stunning HDR Portraits
- [Updated] From Video to GIF Seamless Process for Vimeo Content
- [Updated] How to Relive Facebook's Yesteryears - Instructions for Digital Devices
- 2024 Approved Perfect Timekeeping A Guide to Adding Timestamps in YouTube Links
- Configuring Win11's Color-Changing Features
- Differences Between Sony's PS5 Slim Model and Full-Sized Console
- Effortless Solutions: Resolving the Windows 0xC000012F Stop Error
- Effortless Steps to Blur Distractions in Google Meets
- In 2024, Why does the pokemon go battle league not available On Realme C53 | Dr.fone
- Integrating Advanced Protection Into Windows 11'S Edge Browser
- Keeping Your Customized Windows Mixer Levels
- Navigating Size Changes: Using Your Computer's Keys to Resize Software in Win11
- Overcoming the Disabled Windows Update Issue
- Overcoming Windows' 0X80860010 Application Overload Trouble
- Quick Download of Realtek ALC Audio Drivers Compatible with Windows 11
- Screen Size Snafus in Windows: How to Correct Them
- Step Up Your Game with These 9 Improvements in Outlook, Windows Edition
- The Best 8 VPN Hardware Devices Reviewed On Motorola Moto G13 | Dr.fone
- Windows 11 Readiness: Enabling TPM, Secure Boot Pre-Upgrade
- Title: Windows Firewall: A Complete Reboot Guide
- Author: Richard
- Created at : 2024-12-04 20:01:05
- Updated at : 2024-12-06 16:24:44
- Link: https://win11-tips.techidaily.com/windows-firewall-a-complete-reboot-guide/
- License: This work is licensed under CC BY-NC-SA 4.0.